
AmpliPi™ is a multi-room/zone audio controller designed for whole house wired audio systems. AmpliPi can play four simultaneous stereo audio streams to one or many zones, configurable in real-time using the self-hosted web app or its underlying REST API. The system is expandable to 36 stereo zones using AmpliPi Zone Expanders.
AmpliPi ships pre-configured and ready to go out-of-the-box, but what really sets us apart is our open source, DIY-friendly design, based on the Raspberry Pi CM3+ module.


AmpliPi™ is a multi room/zone home audio controller and amplifier made for whole house audio systems with many zones. It can play up to 4 simultaneous audio streams (Pandora, Spotify, AirPlay, etc) or sources (RCA inputs), each routed to one or many zones, all of which are configurable in real-time using the self-hosted AmpliPi Web App or its underlying REST API. It is expandable up to 36 zones using AmpliPi Zone Expanders. AmpliPi ships pre-configured and ready to go out of the box. Plug it in, connect your speakers, add your streaming audio accounts, name your zones, and begin enjoying smart whole-house audio in no time!
Open Source Freedom
One thing that sets apart the AmpliPi design is that we have made it open source, from the software, to the firmware, to the schematics. The REST API and Web App are written in Python and run on a Raspberry Pi 3+ Compute Module. The firmware, which provides the low level volume control and zone configuration is written in C and configured by the Python API over I2C. All of the internal circuitry comes with full schematics. Visit our AmpliPi repository on GitHub to view the latest software and firmware source files, release builds, as well as hardware documentation, block diagrams, and schematics.
With the open source model, you as the end user have complete control over your system. Want to control AmpliPi with your existing smart home system? No problem - write a software bridge between the systems using our well documented and easy to understand API interface. Need a specialized input or output that the AmpliPi hardware does not provide? No problem - use our complete schematics and hardware documentation to add your own custom hardware to the AmpliPi box. Of course, most of us will use and enjoy AmpliPi without ever looking at a schematic or writing a line of code, but as designers and tinkerers at heart it was important to us that the option was there.
The system is self-hosted on the Raspberry Pi and is privacy focused. By design, AmpiPi doesn’t listen to you or spy on you — it just plays your audio! The way it should be. An internet connection is only needed for some external streaming sources, such as Pandora. The Python application running on the Pi hosts a mobile-friendly website and REST API used to control the system. The website is built on top of the REST API.
The entire software setup is open sourced on GitHub and available here. Here you have access to all the source code and documentation, along with hardware documentation, including schematics. Through our GitHub page you can also join the discussion: post feedback, submit ideas, as well as view and update the "Q&A" and "Show and Tell" sections. The AmpliPi REST API is documented using the OpenAPI specification. You can view the API documentation and even try it out by selecting your AmpliPi box or our demo API server. Go here now to check it out!
Flexible Design
Each AmpliPi unit has 8 total audio inputs: 4 streaming and 4 analog (RCA). Every input can be connected to one or many outputs. Up to 4 simultaneous inputs can be mapped to outputs at any given time. The base system provides 6 stereo outputs at up to 79W per channel using super efficient class-D audio amplifiers. The speaker outputs use Euroblock connectors, which accept wire up to 12AWG and can be removed from the unit for easier installation. The number of outputs can be increased by adding AmpliPi zone expander units. Each additional expander unit provides 6 more stereo output zones, with audio sources and control information passed between the base unit and expansion units using the included 16-pin ribbon cable.

The Story of AmpliPi
by Jason Gorski, Founder and President

Jason listening for noise on the amplifier circuit
The idea for what became AmpliPi started a few years ago while I was remodeling my house. I had installed several in-ceiling speakers in each room with the dream of having an integrated whole house audio system. I wanted something that could pipe music into every part of the house. I dreamed of being able to play my favorite Pandora radio station, Matt and Kim Radio, around the house and outside. I wanted it to be easy for friends and family to take control of the system and play their own music during parties or gatherings. I wanted the system to allow for multiple simultaneous audio sources, so the outdoor speakers could easily be separated from the main living area and the downstairs apartment could be separated so whoever was living there had total control of their own domain.
However, when I went to look for a controller for my home audio setup, all I found were the following mediocre options:
• A system from Sonos, but at roughly $600 per zone, the price tag exceeded $10,000!
• An ancient whole house audio controller that used wired in-wall control panels in each room to adjust the volume and source and provided inputs for local sources such as a CD-changer or cassette player, with no streaming audio support.
I don't know about you, but I could not justify $10,000 for an audio system controller, and the idea of installing the other audio controller that looked like it was out of the 1990s seemed like a step backwards. My search for the perfect home audio control system was a complete disappointment. So, I decided to build my own! I knew what I wanted: a home audio system that was affordable, compatible with the most popular streaming sources, easily adaptable and reconfigurable to work with the ever-changing landscape of smart home systems, and able to provide high quality sound to each zone while being incredibly energy efficient.
AmpliPi became my guilty pleasure project while I was working on my Ph.D. in Electrical Engineering. It filled in the cracks of time while I was working through more theoretical problems, or when I just needed a little break. As I pushed through and finished my Ph.D and started teaching courses at the University, AmpliPi took a backseat.
A few years later, my home renovation projects were nearly finished. One of the last pieces was the whole house audio system. The equipment rack in the basement had a hole where the AmpliPi box and zone expanders were destined to be. After my Ph.D., I started an engineering design company. Through consulting and other work, we were able to grow the company and assemble a great team of hardware, firmware, and software engineers. We also purchased a surface-mount electronics assembly line for quick prototyping.
We picked up the AmpliPi project with the force of a lean company behind it. The audio switching matrix and amplification subsystem matured and became easily controllable. Several of our software and firmware developers pulled together a sweet JSON API and Web App. We designed and built a controller board based around the Raspberry Pi Compute Module 3+ to replace the under-powered controller used in the past. The end result? I could finally play Matt and Kim Radio on my house setup and easily control the entire system and stream audio from my smartphone. It worked, and it worked well. Energy usage was very low thanks to the class-D amplifiers and active power management system. The music sounded great, and the system was efficient and stable.
The Interface
AmpliPi hosts a mobile-first web app that can control the system from any PC or mobile phone on the local network. It was designed around the idea that each of the 4 audio sources could be controlled individually by separate people in the house. Each of the audio sources’ controls are in their own tab at the top of the app. A source has an input selector to pick what is playing. So playing a Pandora radio station on that source is as simple as picking, for example, Matt and Kim Radio from the drop down.

Selecting an audio source

Changing group and zone volumes

Adding a group or zone to a different source
Underneath the input selector are the volume controls for groups and zones connected to the source. The number of zones present is determined by the number of zone expander units discovered during system startup. Zone volume controls only control themselves, whereas group volume controls adjust the volume for all of the zones in the group. The user can create an unlimited number of groups. Zones can also belong to multiple groups.
Below the volumes is an add zone/group selector. To play the current Pandora station when you move to the living room, just add ‘living room’ from the selector. Living room will be removed from the audio source it was previously connected to (if any).
REST API
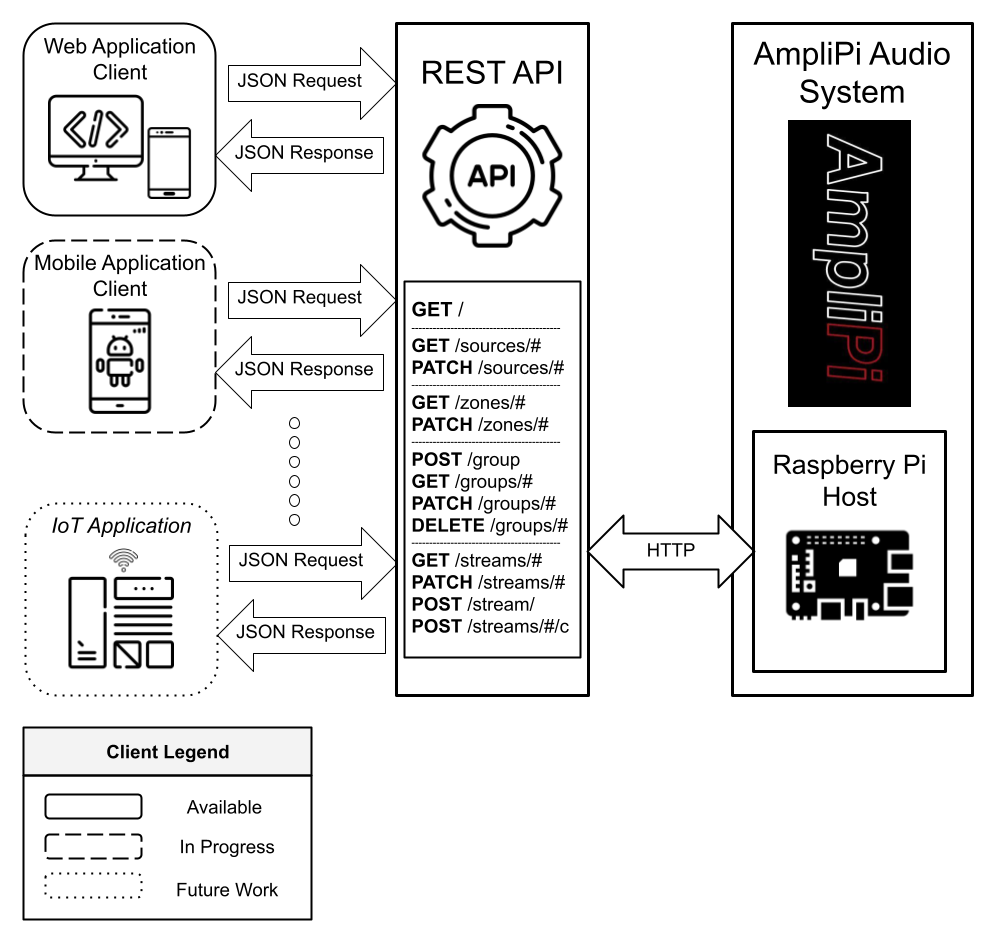
AmpliPi has a REST API that can be used to control volumes, switch and control audio sources, configure different streaming sources, and much more. It allows full configuration and real-time control of the AmpliPi system. The API conforms to the OpenAPI standard. It is fully documented on our AmpliPi OpenAPI site.
With the REST API you can easily add automation to your home audio system. Use the API to trigger your AmpliPi system to play music based on smart home events. For example, only play music in zones of your house where motion has been detected, or start playing Pandora when the front door is unlocked.
Not quite sure how to accomplish this? No problem - The AmpliPi controller hosts it's API documentation as well. Using a web browser pointed at your local AmpliPi box, you can view the API documentation, and also test sending and receiving API commands to and from the AmpliPi.
The Hardware
The base AmpliPi home audio unit consists of three main circuit boards:

Amplifier Board: This board contains the 6 stereo class-D PWM amplifiers. We chose class-D for several reasons: They are incredibly efficient (over 90%), run very cool, and when paired with several layers of good bypass caps, can provide massive amounts of power to speakers with minimal power supply headroom. Unlike their linear class-A and B cousins that constantly draw power and dissipate the majority of it into the heatsinks, class-D amplifiers use pulse width modulation to draw power only when it is needed by the speakers. This allowed us to not only create an incredibly efficient system that consumes under 7 watts of power at idle, but also can be passively cooled the majority of the time, with internal fans that activate and adjust their speed according to system temperature.
Preamp Board: This board contains a 6x4 audio matrix switching system and volume control network that is managed by an STM32F030 ARM microcontroller. The ARM MCU also controls the mute and power settings for the amplifiers. High-level control is done over the I2C bus through a simple register interface. An interesting feature of the matrix switching system is that it is capable of input channel mixing; small changes to the firmware would allow the user to mix multiple inputs on one or more outputs.
Controller Board: This board contains the RPi Compute Module 3+ and audio DACs. The RPi module runs the Raspberry Pi OS (a Debian-based Linux OS) and provides a complete embedded hosting platform for the API interface, Web App server, and streaming music clients (Pandora, AirPlay, Spotify, etc). The RPi module also communicates with the STM ARM MCU on the Preamp board over I2C to control the muxing and amplification systems. Access to the OS can be achieved over the Ethernet interface via SSH or locally using the HDMI and USB ports. A USB service port is provided to perform OS updates.
Along with the 3 main system boards, the AmpliPi controller also contains a high-efficiency (over 85%) Mean Well switching power supply and a power distribution board. The power distribution board creates all the various analog and digital voltage rails required by the system. This board allows all supplies, with the exception of the core 5V Raspberry Pi power, to be disabled when the system is in a standby state. Through our active power management implementation, we are able to achieve a standby power consumption under 7 Watts.
A small display is also included on the main AmpliPi controller. It ships from the factory configured to display vital system information such as current IP address, system utilization, and volume levels, however it can be configured to display whatever the user would like using the included software.